Before we start! This article is a guest post by my friend Gabriel Colson. Here are his links:
Please, do not hesitate to reach out to him if you have any questions! Also, Gabriel is currently available for freelance work.
I have been building real world applications with the Prisma Framework for the past few months. As they officially released the version 2.0, I thought it could be interesting to share my experience.
In this article, I will show you how and why you should build your next GraphQL API with Prisma. For demonstration purpose we will build a simple API that could be used for a basic blog application. The complete code can be found in this GitHub repository.
Summary
[TOC]
Requirements
In order to follow along in the best conditions, here are a few requirements:
- Basic knowledge of TypeScript, Node.js, and GraphQL
- Docker and Node.js installed
Architecture
In a typical web application, the code can usually be split in 3 distinct layers:
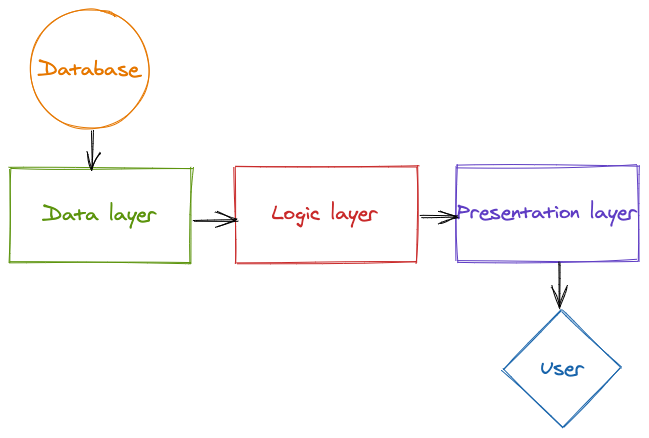
The data layer
This is the code responsible to shape, persist and access the data consumed
by the application. In the case of our app, it will describe the shape of a
Post, a User, etc. It will also provide basic CRUD (Create, Read,
Update, Delete) operations, so we can manipulate and persist the data
easily.
The logic layer
This is where the core behavior of the application is defined. For instance, this is where filtering on the data might be implemented.
The presentation layer
This is the layer responsible for presenting the data to the user. It will make the necessary transformations so that it can be sent via GraphQL, REST, or any other endpoint.
The Tools
Prisma
There is usually 3 ways to interact with a database in Node.js:
-
Raw SQL written in a string. You have absolutely no type safety, no auto completion, and no syntax highlighting. It is hard to write and hard to maintain.
-
SQL query builders like knex. It is basically raw SQL with a JavaScript syntax. You have close to zero autocompletion, no type safety, and a bloated code that you will probably hide behind a nicer abstraction that you have to write yourself.
-
ORMs like sequelize where you redefine your SQL schema as JavaScript classes. It gives you a strong type safety but there is often a lot of boilerplate and you might lose some of the flexibility you have on query builders.
Prisma took the best of the three worlds: from a single source of truth in
the schema.prisma where you define the shape of your data, it creates
database migrations and generates a whole data access layer. This data
access layer is consistent, fully typed, and fully documented. You can
heavily lean on the auto completion of your text editor and if you do
something wrong, the TypeScript compiler will catch it and tell you
exactly what at build time. You have the type safety of an ORM without the
boilerplate and the flexibility of a query builder with a nicer API.
We will start to play with the Prisma Client in a bit but if you want to know more about it I strongly advise you to take a look at their docs.
Nexus Schema
@nexus/schema is a “declarative, code-first and strongly typed GraphQL
schema construction for TypeScript & JavaScript” (from the
graphql-nexus/schema repository).
It is a library developed by the Prisma team which allows us to build maintainable and fully typed GraphQL schemas. One of the advantages of this library is that it has a very good integration with Prisma through the nexus-prisma plugin.
Note that @nexus/schema is a component of the
Nexus Framework, but it can be used
as a standalone as well. We will not use the Nexus Framework in this article
because it is still not ready for production but, if you feel adventurous, it
might remove some boilerplate and reduce even more the amount of code you
have to write.
Database
In this guide, we will use an instance of PostgreSQL in a Docker container, but you can choose any of the database systems supported by Prisma.
Final Architecture
Here is a look at the final architecture, with the layers we discussed earlier visible:
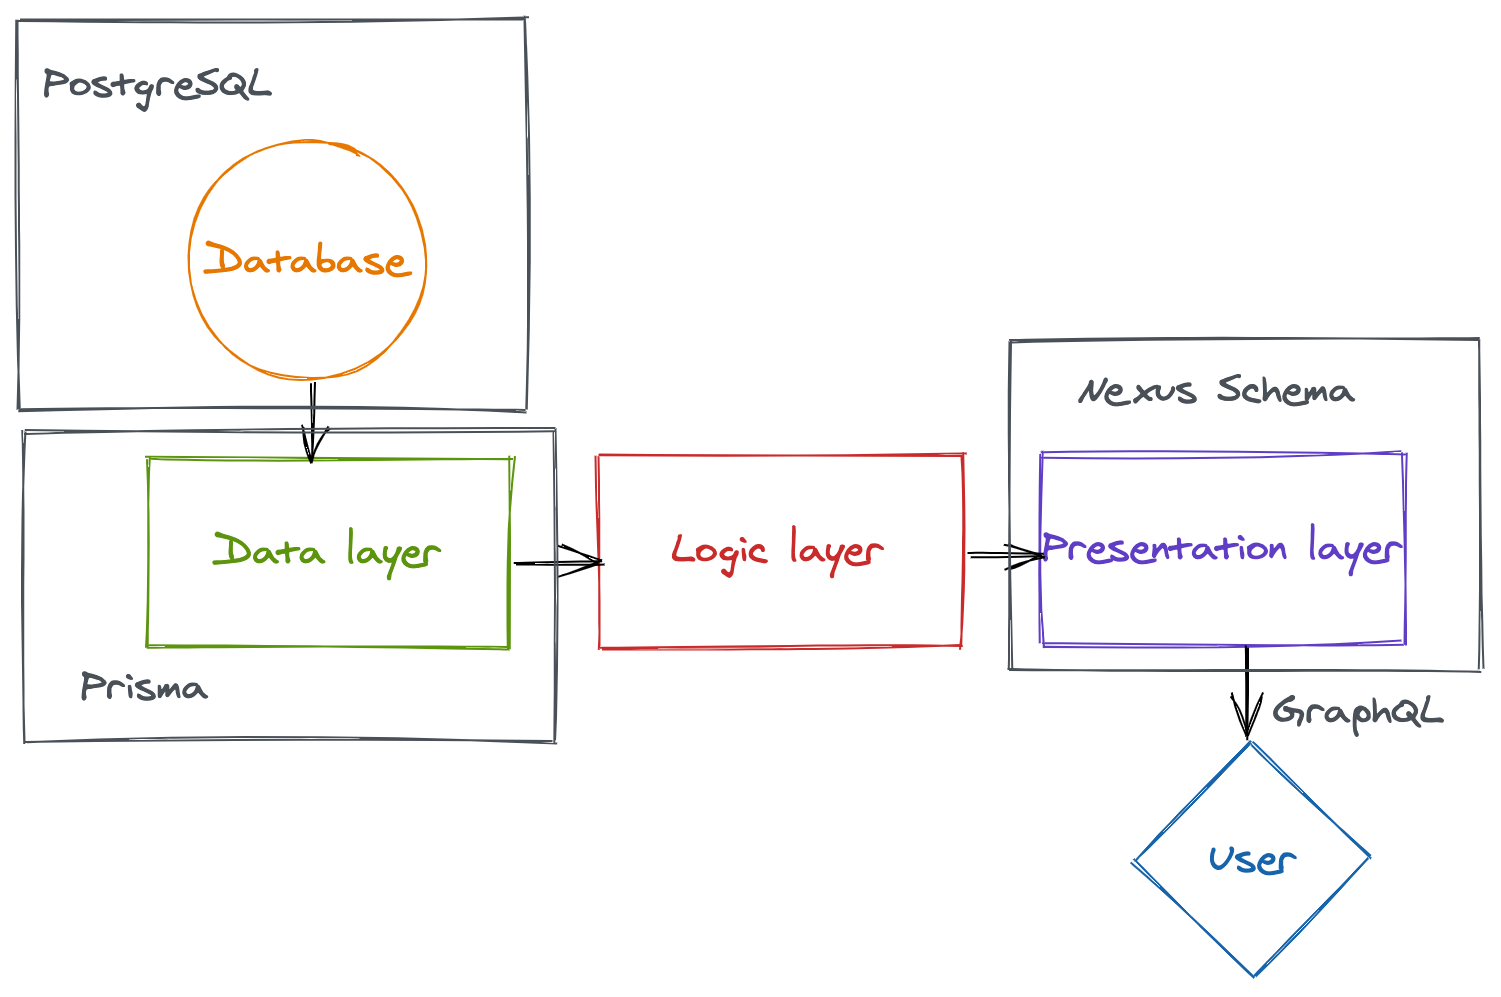
Prisma handles the data layer, Nexus Schema the presentation layer and all we have to care about is the logic layer: the real core of our application.
Now, let’s move on to the example: an API for a simple blog application.
Project setup
First things first, we need to bootstrap our project and install the necessary dependencies.
We start by creating a new directory for our application:
mkdir blog-api
cd blog-api
Next, we need to initialize our TypeScript project:
npm init -y
npm install typescript ts-node @types/node --save-dev
Then we can add a basic TypeScript configuration in the tsconfig.json file:
{
  "compilerOptions": {
    "sourceMap": true,
    "outDir": "dist",
    "strict": true,
    "lib": ["esnext"],
    "esModuleInterop": true
  }
}
Finally, we can create a simple “Hello World” in src/index.ts:
console.log('Hello World');Add a script in the package.json:
"start": "ts-node src/index.ts"And make sure everything works fine:
npm start
# Output: Hello World
Prisma
Setup
Now, we need to set up Prisma. We can start by adding the Prisma CLI and
launching the init command:
npm install @prisma/cli --save-dev
npx prisma init
This will create a prisma directory with basic schema.prisma and .env
files.
We will now spin up a PostgreSQL instance in a Docker container and connect it to Prisma.
docker run                        \
  --name blog-api-db              \
  -e POSTGRES_PASSWORD=postgres   \
  -e POSTGRES_USER=postgres       \
  -p 5432:5432                    \
  -d                              \
  postgres
This command starts a container running PostgreSQL and listen to the port 5432.
All we have to do now is to replace the content of the prisma/.env file
with this:
DATABASE_URL="postgresql://postgres:postgres@localhost:5432/blog?schema=public"The Prisma Schema
Before we start to play with the generated Prisma Client, we need to define
the shape of our data in the schema.prisma. To keep our blog application as
simple as possible, the only objects we will store in the database will be
users and posts.
The user is quite simple: an id, a name, and an email.
model User {
  id    String @default(cuid()) @id
  name  String
  email String @unique
}
The post is simple as well: an id, a title, and a content. We also add a
slug field so we can easily retrieve a post by its URL.
model Post {
  id      String @default(cuid()) @id
  title   String
  content String
  slug    String @unique
}
We now need to define the relation between a User and a Post. A user
should be able to have multiple posts. This is a typical example of the “one
to many” relation explained in the Prisma docs.
model User {
  id    String @default(cuid()) @id
  name  String
  email String @unique
  posts Post[]
}

model Post {
  id       String @default(cuid()) @id
  title    String
  content  String
  slug     String @unique
  author   User   @relation(fields: [authorId], references: [id])
  authorId String
}
To apply the modification to our local database, we first have to save the migration step:
npx prisma migrate save --experimental --name=create-user-post-modelsThen, we can apply this migration step:
npx prisma migrate up --experimentalThe Prisma Client
Now that our database is ready, we can generate the Prisma Client that will allow us to manipulate the data in our application.
First, we need to install the @prisma/client package:
npm install @prisma/clientFor now, the @prisma/client is just an empty shell. We need to call the
prisma generate command so Prisma can create the CRUD functions of the
resources defined in the schema.prisma.
npx prisma generateIf everything went good, we should be able to use it in our src/index.ts file:
import { PrismaClient } from '@prisma/client';

const prisma = new PrismaClient();

async function main() {
  await prisma.user.create({
    data: {
      name: 'Gabriel Colson',
      email: 'gabriel@demo.com',
    },
  });

  await prisma.post.create({
    data: {
      title: 'GraphQL API with Prisma',
      slug: 'graphql-api-with-prisma',
      content: 'A super article',
      author: {
        connect: {
          email: 'gabriel@demo.com',
        },
      },
    },
  });

  const post = await prisma.post.findOne({
    where: { slug: 'graphql-api-with-prisma' },
    include: { author: true },
  });

  console.log(post);
}

main().finally(() => prisma.disconnect());
This little script demonstrate how easy it is to use the Prisma Client. The code speaks for itself: we create a user, we create a post linked to this user, and we fetch the post including its author. I strongly encourage you to write this code by yourself on your favorite editor, so you can appreciate the level of auto-completion.
Building the GraphQL schema
Now that we have our data layer, let’s build the presentation layer!
@nexus/schema
First, we need to add @nexus/schema to our dependencies.
npm install @nexus/schema graphql@^14.5.0We can start by creating our basic types in a new src/schema directory.
// src/schema/User.ts
import { objectType } from '@nexus/schema';

export const User = objectType({
  name: 'User',
  definition(t) {
    t.id('id');
    t.string('name');
    t.string('email');
    t.list.field('posts', { type: 'Post' });
  },
});

// src/schema/Post.ts
import { objectType } from '@nexus/schema';

export const Post = objectType({
  name: 'Post',
  definition(t) {
    t.id('id');
    t.string('title');
    t.string('content');
    t.string('slug');
    t.field('author', { type: 'User' });
  },
});
Then, we need to build the GraphQL schema with the makeSchema function from
@nexus/schema:
// src/schema/index.ts
import * as path from 'path';

import { makeSchema } from '@nexus/schema';

import * as User from './User';
import * as Post from './Post';

const schema = makeSchema({
  types: [User, Post],
  outputs: {
    schema: path.join(__dirname, '../../schema.graphql'),
    typegen: path.join(
      __dirname,
      '../../node_modules/@types/nexus-typegen/index.d.ts'
    ),
  },
});

export default schema;
Nexus will generate 2 different artifacts in development mode:
- A GraphQL schema, it gives us a clear view of how our final API looks like
- The Nexus types, it ensures type safety in our resolvers.
To generate those files, we can add a script to our package.json:
{
  "scripts": {
    "generate:nexus": "ts-node src/schema/index.ts"
  }
}
Run the script to see the generated files:
npm run generate:nexusnexus-plugin-prisma
As we can see, our GraphQL schema is the exact mirror of our database schema. To avoid repeating ourselves, there is a Nexus plugin that will allow us to reuse our Prisma types inside the GraphQL schema definition.
Before installing it, we need to remove our @prisma/* dependencies because
they are already embedded in the plugin. For more information, you can read
Nexus’ philosophy on dependency management.
npm uninstall @prisma/cli @prisma/client
npm install nexus-plugin-prisma
Then, we can pass the plugin to the makeSchema function:
import { nexusSchemaPrisma } from 'nexus-plugin-prisma/schema';

const schema = makeSchema({
  // ...
  plugins: [nexusSchemaPrisma()],
});
This plugin will add a model field in the t object from the definition
function from Nexus’ objectType config. This model field will allow us to
derive our GraphQL schema from our Prisma schema without losing the type safety.
Here is the new version of User.ts and Post.ts:
// src/schema/User.ts
export const User = objectType({
  name: 'User',
  definition(t) {
    t.model.id();
    t.model.name();
    t.model.email();
    t.model.posts();
  },
});

// src/schema/Post.ts
export const Post = objectType({
  name: 'Post',
  definition(t) {
    t.model.id();
    t.model.title();
    t.model.content();
    t.model.slug();
    t.model.author();
  },
});
The model field is fully typed thanks to the nexus-prisma-plugin and
the Prisma client. To keep everything in sync we can add the following scripts
to our package.json:
{
  "scripts": {
    "generate": "npm run generate:prisma && npm run generate:nexus",
    "generate:prisma": "prisma generate",
    "generate:nexus": "ts-node src/schema/index.ts"
  }
}
You can now run npm run generate to generate the Prisma client and the
Nexus types.
Queries and Mutations
Now that our types are defined, we need to expose queries and mutations to
our users, so they can interact with our data. We could create a Query.ts
file like Post.ts or User.ts but as our application grows, this file will
become massive. In my opinion, it is much more scalable to keep the queries
and mutations close to the types they interact with.
// src/schema/User.ts
import { extendType, idArg, objectType, stringArg } from '@nexus/schema';

export const User = objectType({
  // ...
});

export const UserQuery = extendType({
  type: 'Query',
  definition(t) {
    t.field('user', {
      type: User,
      args: {
        id: idArg({ required: true }),
      },
      resolve: (root, { id }) => {
        return { id, name: '', email: '', posts: [] };
      },
    });
  },
});

export const UserMutation = extendType({
  type: 'Mutation',
  definition(t) {
    t.field('createUser', {
      type: User,
      args: {
        name: stringArg({ required: true }),
        email: stringArg({ required: true }),
      },
      resolve: (root, { name, email }) => {
        return { name, email, id: '', posts: [] };
      },
    });
  },
});
We just added a mutation that creates a user, and a query to fetch a user by
its ID. You can run npm run generate:nexus to see the updated API in
schema.graphql.
The implementation for the posts is quite similar, but I will omit it for this article. You can check out the GitHub repository to have a full implementation.
Apollo Server
Now that we have defined our GraphQL schema, it’s time to make it available to the users thanks to an HTTP server. Apollo Server is a good solution, but you could use any server you want (Express and a GraphQL middleware for example).
Let’s start by adding apollo-server to our dependencies:
npm install apollo-serverYou can replace the content of src/index.ts with this code:
// src/index.ts
import { ApolloServer } from 'apollo-server';
import schema from './schema';
const server = new ApolloServer({
schema,
});
server.listen().then(({ url }) => {
console.log(`🚀 Server ready at ${url}`);
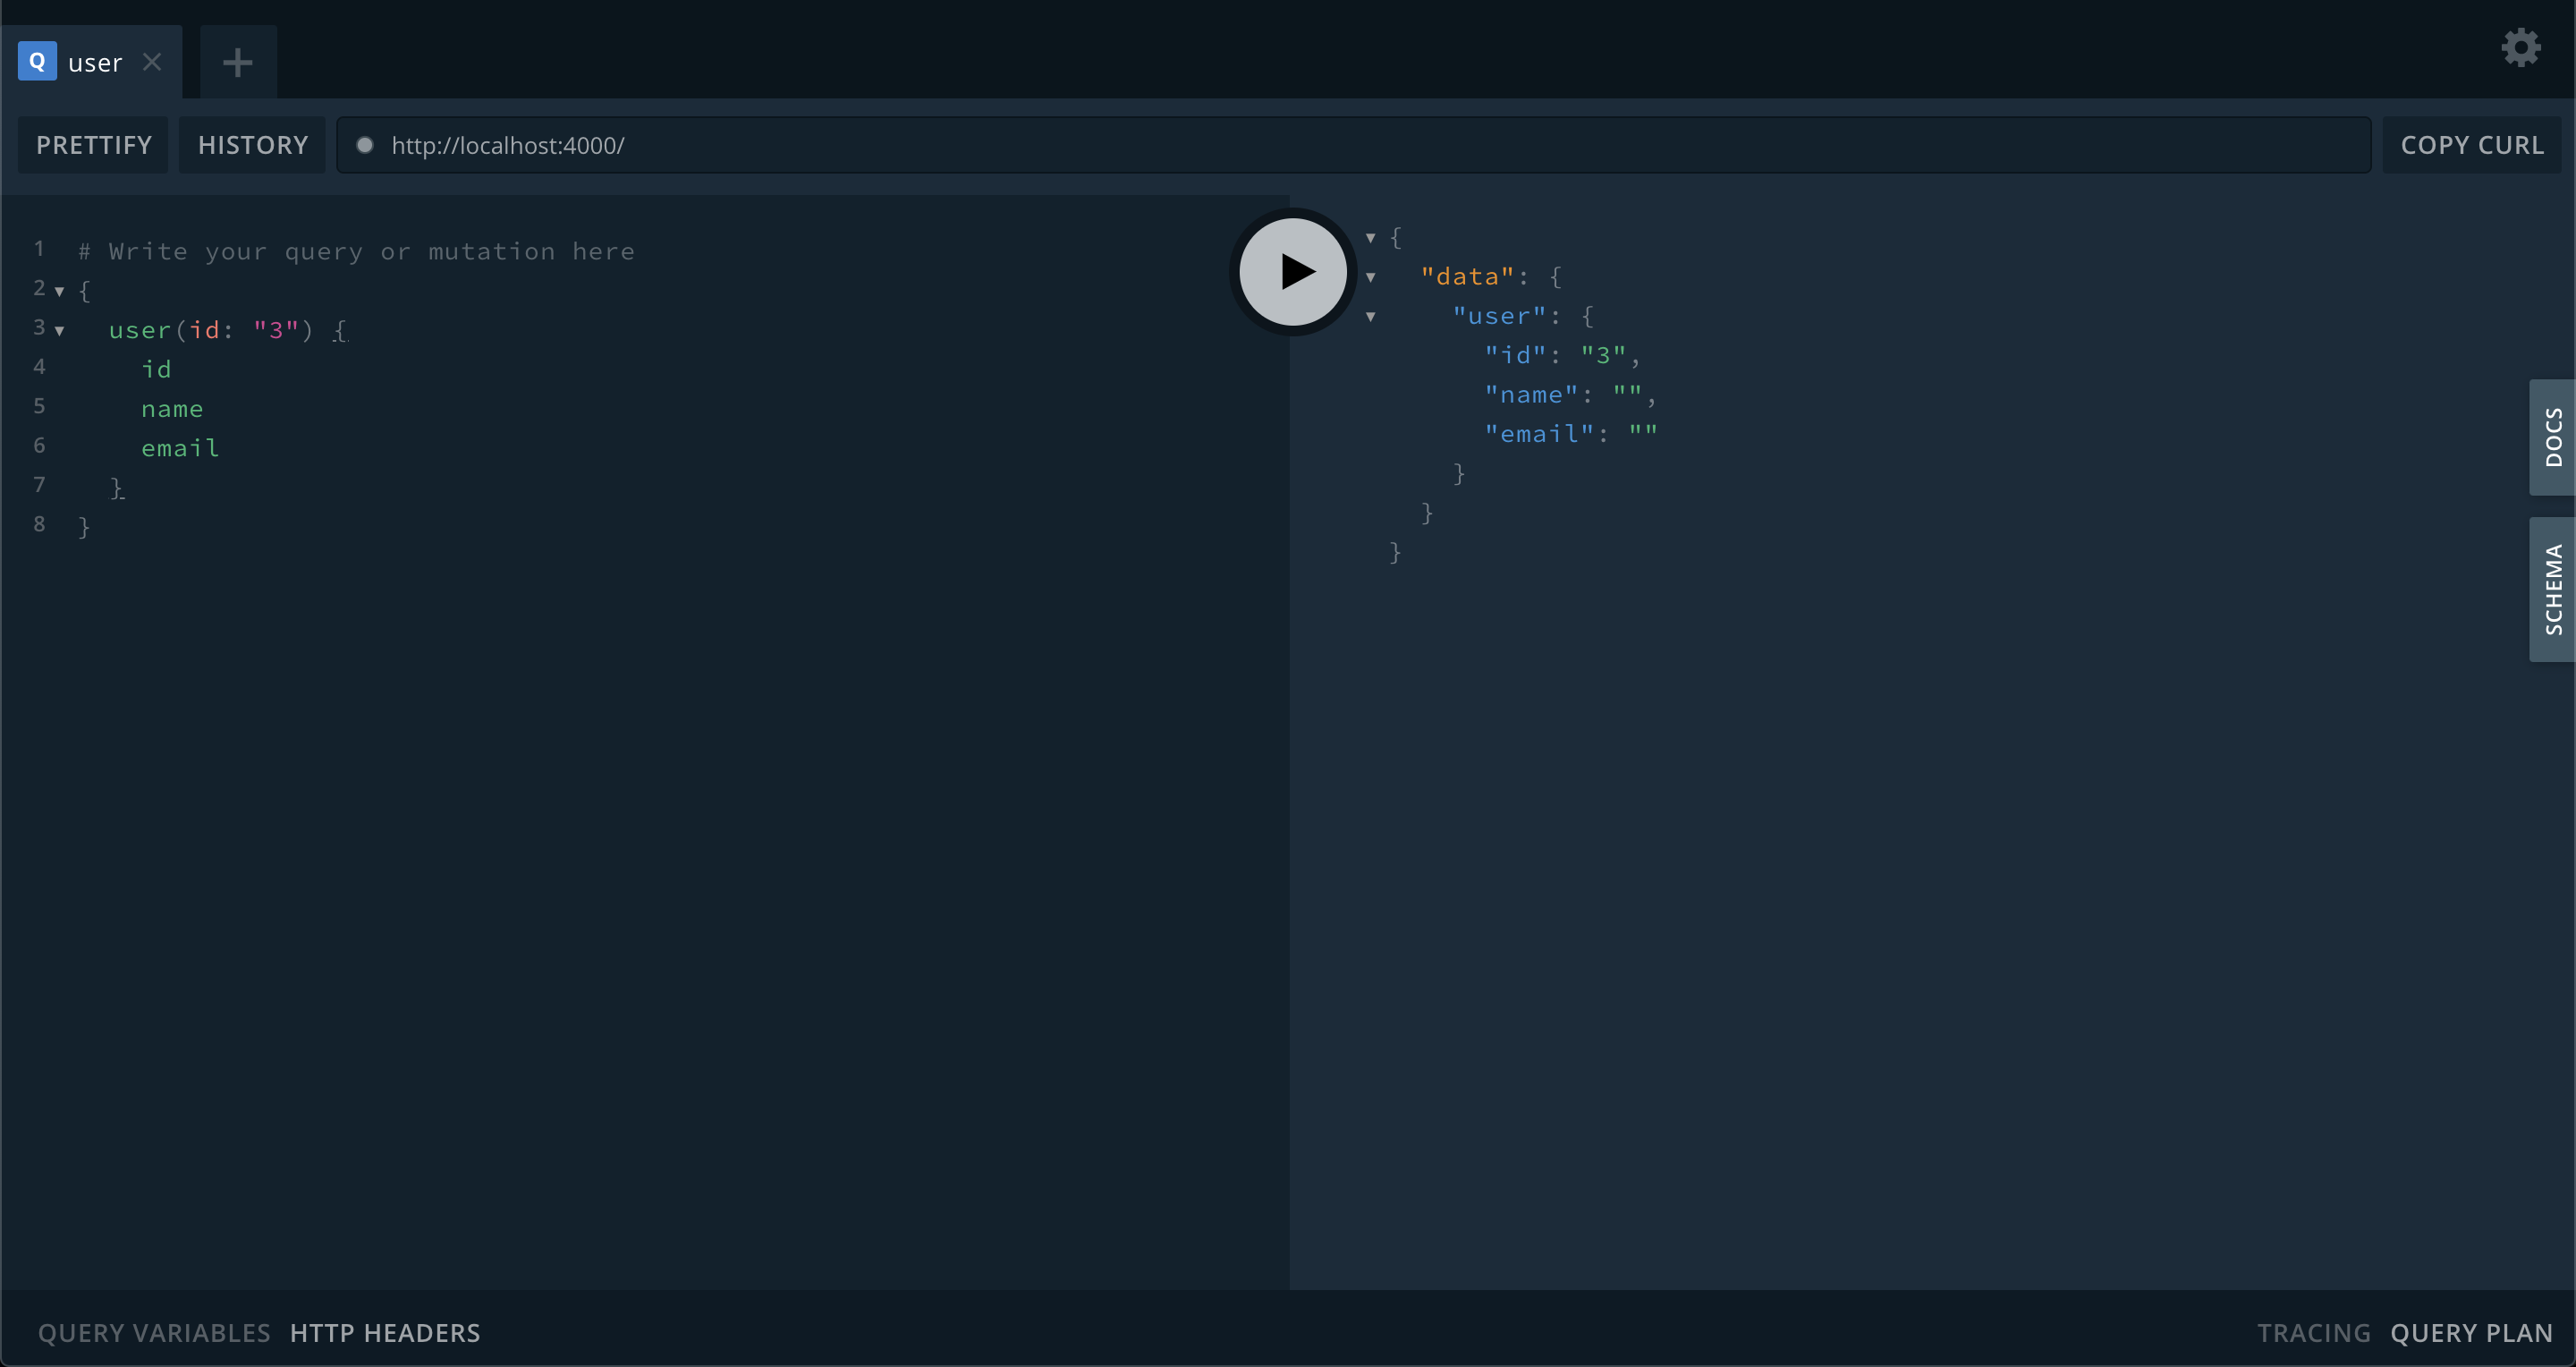
});Run it with npm start and go to http://localhost:4000/. From there you
access the GraphQL Playground where we can play with our schema and make sure
everything works as expected.
The Context object
We have a GraphQL API, but you can see that the actual logic is missing. In
order to really communicate with the database we need to pass a Prisma
instance to our resolvers. This is exactly why the Context was created. The
Context is a JavaScript object that we create on each request and that will
be passed down to our resolvers. Let’s create one containing our Prisma
instance:
// src/Context.ts
import { PrismaClient } from 'nexus-plugin-prisma/client';

export interface Context {
  db: PrismaClient;
}

const prisma = new PrismaClient();

export const createContext = (): Context => ({
  db: prisma,
});
Here we added a Context interface and a createContext that returns a new
instance of this interface. We can make Apollo Server create this context on
every request in its configuration:
// src/index.ts
import { createContext } from './Context';

const server = new ApolloServer({
  schema,
  context: createContext,
});
We also need to provide nexus-prisma-plugin the “path” to the Prisma client
instance inside the context:
// src/schema/index.ts
const schema = makeSchema({
  // ...
  plugins: [nexusSchemaPrisma({ prismaClient: ctx => ctx.db })],
});
We can now access ctx.db in every resolver:
export const UserQuery = extendType({
  type: 'Query',
  definition(t) {
    t.field('user', {
      type: User,
      args: {
        id: idArg({ required: true }),
      },
      resolve: async (root, { id }, ctx) => {
        // do something with ctx.db
      },
    });
  },
});
The thing is that the ctx parameter is still typed as any. We said
earlier that the biggest advantage of @nexus/schema was to have fully typed
resolvers and this doesn’t seem just right. The reason is that we didn’t
didn’t tell Nexus to use our Context interface as our context type. In
order to do so, we have to add some configuration to makeSchema:
// src/schema/index.ts
const schema = makeSchema({
  // ...
  typegenAutoConfig: {
    contextType: 'Context.Context',
    sources: [
      {
        source: require.resolve('../Context'),
        alias: 'Context',
      },
    ],
  },
});
You can now run npm run generate and see that our context is now correctly
typed.
Our GraphQL schema is now complete and fully typed! You can check the final version in the Github repository.
The Logic Layer
It is now time to write our final missing part. The whole data layer has been generated by Prisma, and we just defined our GraphQL API schema. Our last job is to write the core business logic in between.
To do that, I usually add a services module which contains all the
functions I need in my resolvers. We could write this logic directly inside
the resolvers but as the application grows, it will quickly become
unmaintainable. Extracting these functions defines a clear separation of
concerns and allow you to reuse some logic without duplication.
Here is how I implemented it for User:
// src/services/user.ts
import { User } from 'nexus-plugin-prisma/client';
import { Context } from '../Context';

async function findById(ctx: Context, id: string): Promise<User> {
  const user = await ctx.db.user.findOne({ where: { id } });
  if (user === null) {
    throw new Error('user not found');
  }
  return user;
}

interface UserData {
  name: string;
  email: string;
}

function createOne(ctx: Context, data: UserData): Promise<User> {
  return ctx.db.user.create({ data });
}

export default { findById, createOne };
We can then use it in our resolvers:
export const UserQuery = extendType({
  type: 'Query',
  definition(t) {
    t.field('user', {
      // ...
      resolve: async (root, { id }, ctx) => {
        return UserService.findById(ctx, id);
      },
    });
  },
});

export const UserMutation = extendType({
  type: 'Mutation',
  definition(t) {
    t.field('createUser', {
      // ...
      resolve: (root, userData, ctx) => {
        return UserService.createOne(ctx, userData);
      },
    });
  },
});
Easy, right? The complete implementation for Post is in the GitHub
repository.
Wrap Up
We now have a fully working GraphQL API connected to a PostgreSQL database
which is fully typed (not a single any in the whole codebase!) thanks to
code generation and we have a clear separation of concerns thanks to our code
organization. For a more complete implementation, you can check out the
GitHub repository
and if you have any questions or remarks you can let me know on
Twitter!